Saturday, June 30, 2012

Dye Crinoline with RIT

When the Hubster proposed to me - I knew what I wanted our wedding colors to be & I knew that I wanted to have color on me somewhere...and it was going to be pink. So - I chose to dye the 2 crinoline skirts I had. Now - David's Bridal and RIT dye will both tell you that you can't dye the crinoline skirts because of

You may also want to go and pick up some more table salt, because you're gonna need a significant amount of it.

You will need:

  • Article of clothing you want to dye
  • Rit dye (I used 2-3 packets for of dye for each skirt)
  • Bucket you don't care for
  • Salt (helps lock in color)
Step 1:
Prep the article of clothing. This was fun - I was very impressed I got the whole skirt into that sink! You want your article to be wet (not necessarily soaked, but wet - I suggest wringing it out before adding it to the dye, but I'm fairly certain I didn't do that.)
  

Step 2:
Prep the Dye. Make sure you wear gloves or else you will end up with stained hands! (it may even happen if you wear gloves...I'm just that awesome - and nothing gets it off except time. I even tried spraying my hand with Resolve to see if it would get it out. Don't try that, it doesn't work. You just walk around with 1 hot pink hand and 1 regular hand until it finally wears off - I think it took a few days; maybe even a week).

This is wear the salt comes in to play.

1/2 cup of salt.


  Dissolve 1 package of powder dye in 2 cups of hot water. If you're worried about the dye not sticking (I was because everyone told me the skirts couldn't be dyed), add in salt. I believe I used 1/2 cup per package of dye. Stir, Stir, Stir!


Set the washing machine for the extended wash cycle or just leave the lid open. The fabric should be in dye bath for at least 30 minutes before rinse begins - I was worried about the dye not working on the skirt, so I let it sit for about 2 hours. And in it goes...


Because there was SO much fabric on this skirt, parts of it kept floating up and out of the water. So, in order to avoid random light patches, we threw a bunch of water bottles on top. They were heavy enough to hold the skirt down.

Now, let it soak!


When the time is up, whether you let it sit for 30 minutes or an hour, you can close the like lid and turn the washer dial to cold water and the "rinse" setting. Make sure you rinse it enough times that the water runs clear. Then wash it with a very mild detergent in warm water and rinse thoroughly in cool water.

Now go figure out where to dry it! My in-laws were worried that if we hung it to dry in the house, it would drip and dye the floor so we set up a ladder outside and hung my skirt off the ladder until it was dry.


This is REALLY important so you don't accidentally dye anything else on your next cycle - run the washing machine on the highest water level with the hottest water, detergent and 1 cup chlorine bleach. I suggest doing an extra rinse and washing a load of whites after this cycle. You will get a pretty good idea if all the dye is out this way, and if it isn't, you can always just bleach the whites.

Worked like a charm.


Here's a picture of the skirts on my wedding day (you can barely see the light pink one- sorry)


And here's a picture of both of them side by side a little over a year later.


Now, I used the EXACT same dye and the EXACT same process on both skirts. The dye took better to one skirt than the other - which is probably because they were made by different companies so the materials were probably slightly different - and is most likely why RIT and DB said that the skirts cannot be dyed.

I say - if you want a fun pop of color, go ahead and give it a try - I was very pleased with what I got. I ultimately had 3 skirts on my wedding day. My dress came with some crinoline underneath it (so that stayed white), then there was the light pink skirt, and then the dark pink skirt.

Good luck!
Sara


Oh - and here's a before and after of a dress I dyed for a friend's wedding:

Friday, June 29, 2012

Organizing the Kitchen

I'm fairly certain that we have the largest apartment kitchen ever. I'm actually going to miss it when we get a house. It's massive and wonderful and I love it - BUT since we moved in we haven't really put things away in a logical way - just kinda put it in cabinets because we wanted it to be put away. Well, it's time to get organized because it's kind of obnoxious having to go back and forth across the kitchen because the coffee filters are one place and the coffee maker is on the other side...


So here we go.


I've found that the best way to organize is to:
  • Assess the situation
  • Don't necessarily look at the ENTIRE picture - pick one section at a time and focus on that
  • Group like items with like items
  • Put items in places that are logical - for example: pots & pans near the stove, towels near the sink, etc.
  • Take breaks if you need to - it may be a larger project than anticipated, and if you're anything like me, you'll need breaks and probably frequent ones. I get overwhelmed by clutter and messes very easily so when I pull everything out - sometimes I just need to go to a different room and take a breather. 
  • Take as much time as you need - don't start if you're expecting people over soon (I've done this - it's generally not very productive).


First, take a deep breath and decide where you want to start first.
I chose to start with the cabinets & drawers closest to the refrigerator.
 
I pulled everything out of the cabinets and drawers.
Originally:
Top Cabinet: cups, glasses, pitchers, Brita filter replacements and drink accessories - top shelf held the pitchers, replacements and accessories which meant they hardly ever got used because it involved, not a step stool, but a step ladder - and sometimes actually having to stand on the counter top to get to the stuff in the back of the top shelf. Not practical for items we use frequently.
Drawer: junk drawer.
Bottom Drawer: Vases, first aid kit, and random things I just put down there to get off the counters. Again, no order so it wasn't really practical.  
Counter: mail collection center  - this was a terrible idea.  

Now: Group like with like.
Top Cabinet: Cups & Glasses
Drawer: Drink Accessories - juicer, Popsicle maker (I put this here because I usually make them with juice), straws (not pictured)
Bottom Cabinet: Pitchers & Vases, Filter replacements
Counter: Bread-maker & cutting board - these items don't fit in any of our kitchen cabinets & while I would like them to be able to be stowed away somewhere, since it's not really an option, I just placed them in the least used place in the kitchen. Not the prettiest, but it worked.


This little corner doesn't get much action, but I liked having the Tupperware stuff near the refrigerator and I liked our drawer of teas over here (next picture).

Originally:
Bottom Cabinet: Food Storage - Tupperware bottom, Ziploc bags, cling wrap, etc.
Drawer: Tupperware tops
Top Cabinet: Some serve ware, cookie cutters, waffle iron...
Counter: bread maker, cutting board, bread, butter, honey, other random appliances.


Now:
Bottom Cabinet: First Aid Kit & Medicines (they're placed closer to the knives than before...which is a good thing because I've sliced my hand enough times that this is important.) Extra Food Storage supplies (duplicates or items we don't use often).
Drawer: Food Storage stuff  - Ziploc bags, foil, cling wrap, etc.
Top Cabinet: Tupperware (Much easier to get in and out) and special occasion serve ware, up high because we don't need easy access to it.
Counter: Breakfast bar!  I put our bread & honey in a bread basket (it used to just sit on the counter), butter, and toaster - great for a quick breakfast since we usually wait till the last minute to grab breakfast. To the right, you can't really see it, but is our creamer pitcher (not filled), sugar bowl and coffee maker.


Originally:
Cabinets: place settings and towels, our wedding plate, champagne flutes and wine glasses (top shelf)
Drawer: exactly the same.
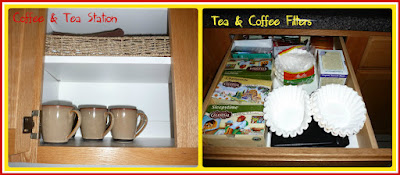

Now:
I really liked having the tea and coffee filters in a drawer - which is why I moved the coffee pot over and made a breakfast bar. That, and where the coffee maker and mugs were originally placed was a high traffic location so Anthony and I were constantly in each others way.
So - I moved the mugs over and placed them above the coffee maker.
Drawer - I left it alone, it was just fine that way.


Again - the key is grouping like items with like.
Originally:
Top Left Cabinet: Cook Books & random nick knacks
Bottom Cabinet: Appliances - placed in no particular order at all
Top Right Cabinet: Towels and place settings and random nick knacks.


Now:
Top Left Cabinet: I relocated the wine glasses and champagne flutes to a more accessible location, and since we use the wine glasses frequently enough, I put them on the bottom and the champagne flutes on the top - since we rarely use them. I'm pretty sure the Hubster is going to appreciate this.


Bottom Cabinet: I rearranged the appliances so that the ones we use most frequently are on top and in the front.  On the bottom we have more party type appliances and serve ware - things we don't use all the time, but enough that being easily accessible is nice.


Top Right Cabinet: This cabinet is close enough to the sink that it makes sense to put the extra dish towels on the bottom. On the top shelf, I placed our table cloths and place settings.


This is pretty much the same, I just got some new storage solutions for the cleaning supply drawer.
I added a towel to catch any water that might drip when putting the things back & I got a drip pan ($5 at Target) to put sponges and the like on after being used.


This is the MOST used place in the entire kitchen!
Originally:
Prep Area 1: Stand mixer, coffee maker, canisters, utensil crocks
Prep Area 2: Oils, Utensil Crocks, Recipe Box, Menu Board
Serving Dishes & Dinner Ware: Held dinner ware and some serve ware (the others were located on the other side of the kitchen)
Kitchen Gadgets: just thrown in the drawer
Utensils: The same with some kitchen gadgets thrown in
Baking Supplies Drawer: Everything just thrown in
Pots and Pans Cabinet: Everything just thrown in - such a huge pain!
Baking Supplies Cabinet: All Bake ware - some nested, some not - made a mess of their lids. All baking pans, attempted to nest them, but always ended up in a fight when I needed the cookie sheets, big measuring cups, mixing bowls, hand mixer
Baking Supplies & Cookbook Cabinet: Random stuff that didn't have a home.


Now:
Prep Area 1: Stand Mixer, Canisters (Flour, White Sugar and Raw Sugar), Utensil Crocks. Removing the coffee maker opened up SO Much more space here!
Prep Area 2: Oils in pretty oil drizzlers instead of just in their store bought containers, utensil crock, recipe box, menu board.
Serving Dishes and Dinner Ware: Now has our serve ware collected in the same spot!
Kitchen Gadgets: Using Bamboo drawer organizers from Bed Bath and Beyond, the gadgets are separated into beverage gadgets, frequently used gadgets (thermometers, pizza cutter, peelers, etc.) and then the larger gadgets that didn't fit in an organizer.
Utensils: Kitchen gadgets have been removed so it only has utensils in it.
Baking Supplies Drawer: Using Bamboo organizers from BBB, I separated them out into measuring cups & hand mixer attachments, measuring spoons, and then other baking items - pie saver, pastry blender, and icing supplies.
Pots and Pans Cabinet: We went to Target and got a pot lid holder, I believe it was about $10. Now no more mess! I pulled the pots we use regularly and placed them on the top shelf. The bottom shelf has pots and pans we rarely use, larger serving dishes that didn't fir in the top cabinets, and "The Beast" aka the most amazing crock pot ever. :)
Baking Supplies Cabinet: Top shelf - Bakeware separate with their lids - anything without a lid got nested. Mixing bowls (nested), and rolling pins. Again, the more frequently used items placed at the front. Bottom shelf - Hand mixer, larger measuring cups (nested), and the muffin pans (nested - they're a little too large to fit with the other baking pans).
Baking Supplies & Cookbooks: Cooling racks in the back, baking pans (nested), cookie cutters, and then cookbooks. The top shelf has a box of items that have no home in our apartment - but will in a house.


Junk Drawers:
Originally these held random kitchen gadgets - but they were so far separated from the prep areas that I always forgot about them.
Now they are our junk drawers - with plastic organizers.
Drawer 1 has things we might need if we're heading out the door: gum, mints, sun glasses, money envelopes, pepper spray (which should really be in my purse and will be as soon as this gets posted), pocket knives/pocket tools, spare change, chap-stick and our coupons.

Drawer 2 has items we might need around the house - tape, lighters, flashlights, lint roller, pens and scissors.


Thursday, June 28, 2012

House Hunting Lessons

     I, once again, cannot sleep. I can't wait for it to be a little bit later today where my hubby will FINALLY be back home to me - but for now I will endure one more almost sleepless night. I'm glad that I haven't been able to fall asleep though. It has given me time to lay here in our bed and reflect on the lessons of today and I am grateful.


     You see, the thing is that I know my weaknesses and my shortcomings, but God knows them better. I haven't been able to keep my mind off of this one thing (difficult submission) since we started house hunting. House hunting is scary and it's new and it's fun and it's stressful and it's so many things. But I am constantly reminded of how much I fail as a biblical wife (by my own convictions) and how much God is using this to teach me and to grow me. You see, when we first moved out here to the 'Zona, things were difficult and I wanted things to go my way - but God was growing me. He lead to me to talk to my dear friend, Shawna, and we got on the topic of being a biblical wife, what it means, and the consequence of Eve's disobedience (sin) to God when she ate from the forbidden fruit. Genesis 3:16 speaks of this consequence: 
"To the woman he said,
'I will surely multiply your pain in childbearing;
     in pain you shall bring forth children.
Your desire shall be for your husband,
    and he shall rule over you.'"
     When God says that her "desire shall be for [her] husband, and he shall rule over [her]", he means that while she was created to live in harmony with her husband and submit to his headship (Ephesians 5: 22-24), she would desire to be the one in control. John MacArthur's study bible explains it like this:
"...Just as the woman and her seed will engage in a war with the serpent, i.e., Satan and his see (Gen 3:15), because of sin and the curse, the man and the woman will face struggle in their relationship. Sin has turned the harmonious system of God-ordained roles into distasteful struggles of self-will. Lifelong companions, husbands and wives, will need God's help in getting along as a result. The woman's desire will be to lord it over her husband, but the husband will rule by divine design (Ephesians 5:22-25). This interpretation of the curse is based upon the identical Hebrew words and grammar being used in Genesis 4:7 to show the conflict man will have with sin as it seeks to rule him."
  During my conversation many months ago, Shawna explained to me that as a wife, I need to submit to my husband's decisions as long as they don't go against the bible - even if I'm not 100% on board because God placed him as the head of our family for a reason. No where in the bible does it say "Wives submit to your husbands unless it displeases you." You can look, but you won't find it. 
     Throughout this house hunting process (from beginning to talk about it to actually getting connected to a realtor), I can't help but think that even when it gets hard - and it will because buying a house is a HUGE decision, I am going to learn how to better submit to my husband's decisions. I wish I was better at it, but the truth is I am a sinful, selfish person, I prefer the known to the unknown and I think I should get my way - not because I deserve it or because my way is better - but because it's my way. You see, the truth is - I'm a very sinful person...and that sucks. But there's good news - VERY good news.
     When Jesus died on the cross for my sins, He sent the Holy Spirit to guide His children. When I gave my life to Christ, the Holy Spirit entered into my life to help guide me through this life. So tonight - I rejoice that God was with me and the Spirit was guiding me.
     I know my husband wants only the best for our family and that he is going to do everything he possibly can to make the best decision through prayer and research and today we found out that we are talking with the seller of a house - they haven't accepted an offer, but they are willing to talk with us. Today we signed a counter offer, I got excited and then the Hubs called.
     There's another house that came up in our portal that he really wants to look at, but they're not accepting offers yet and it needs a little more love, but he wants to look. I'd be lying to say that my heart didn't break - but I am confident that God will lead us to the right house, I am confident that He is growing me to be a better wife and I am confident in my husband. As we discussed not submitting the counter offer, I did my best to not let the tears fall and I did my best to cling to the confidence that God has a much better plan. The tears fell, but I am still confident God has this all under control. And all I could think of was Shawna mentoring me all those months ago, saying, "There will come a time when your husband will make a decision you don't like, but it won't be unbiblical and you are going to have to submit because that is what God has called you to do." I heard that repeated to me tonight, I took a deep breath, tried to swallow my tears and my selfish desires to have a house --this house-- and I did what God wants me to do because I love my husband and because I trust him with every ounce of my being. In that moment, even though I felt like "our" house was getting taken away (which is just silly because we don't have a house), I had to step up to the plate and do the right thing. It's not always easy to do the right thing, but it's always worth it and God will ALWAYS work it out.

     And here's the amazing thing - I learned a lesson (hopefully I won't forget it too quickly) and God was able to provide a compromise on the situation that eased both of our hearts. We know that God is working through this, and ladies, submission is rarely easy thanks to sin but it's worth it because that's what God ordained. Let's be honest, submission sucks when we think we know better (and let's face it, we don't- but God does) or when it goes against what we want. I knew from the start of this adventure that God would grow us, because this is so much bigger than anything I think we've ever had to face (well, besides marriage) and we need God to guide us. I think I knew that I would have to let go of what I think my dream house is and trust that my husband is doing exactly what God wants him to do. I think I knew that God was preparing me for this because it's been on my heart since we walked into the house - but even though I think I knew, it was still hard - but I think this is just SO big that it's SO evident we need God to help us find the best house for us and I can't be stubborn and selfish with that. I can't just say 'No, I want this house and we're so close to getting it that we have to move forward". I really suck at the whole submission to my husband thing - but it was absolutely amazing to see God work through it and to see that He had a compromise already planned out that eased both of our hearts on the situation - and all it took was me being obedient to God.

     I know that there are going to be more occasions in our marriage where I will have to submit to my wonderful husband's leadership even though my pride wants something else and I'm positive that they will be on more difficult things as well. Sometimes the outcome will seem favorable and sometimes it will be difficult, but God is using EVERY circumstance, situation, obstacle, etc. for His good and perfect plan and we will learn something from it every time. God - please continue to guide me in being submissive to my husband's decision and remind me You have a better plan and that You're using my husband and his decisions in that better plan. And I pray that You will guide every woman in submitting to Your plan and the roles that You have given us as women and as wives.

     And what's even more, God amazed me more - in that I was writing this and marveling at God's amazing grace and work in my life and how much He blesses when we are obedient, I received a message from a friend thanking me for being an example of difficult submission. This friend witnessed the conversation; witnessed me trying to not cry, trying to not let my voice break, trying to be strong as my hope in a house I think I'm in love with wavered - and I am thankful that God was with me. I am thankful that God kept me strong. I am thankful that God taught me a lesson and I am thankful that He chose me to be an example for someone - me! Wretched me who tends to cry when things don't go my way because I'm way too selfish. I am blown away that God thought me worthy to be used. Words alone cannot describe how amazed I am that He loves me so much He used me. Blown away at the greatness of the cross. Blown away at the greatness of Jesus. Blown away at the loving leadership of my husband. Blown away by God's blessings. Blown away to the point of joyful tears. God is so amazing, I'm not worthy but He makes me so. I am nothing, but He makes me something.

So maybe this my "dream" house will become our real house and maybe it won't. Either way, God is with us and He has a plan. He knows what house is ours and when we will get it - and even if it takes years and years and years for us to get a house (oh, please don't let it take too long!), I am thankful that He taught me something and I am grateful for His presence in our marriage.


And I can not wait to see this man tomorrow (well, I suppose now it's today)!
love & heart full of joy & hope,
     Sara

Under-the-Sink Organization

Under the kitchen sink always seems to get way cluttered and messy very quickly. So I decided that needed to change. I, once again, didn't take a before picture - but here's the neatly organized under-the-sink area:


What I did:
  • Pull out EVERYTHING from under the sink and wipe down.
  • Group like items with like. 
  • Figure out what works best for you organization wise and do it!
     I put items that we are likely to use frequently on the outside. The plastic bags, dish soap, and cleaners I use daily or weekly were placed closer to the dishwasher on the right.
In the middle, I took a purple plastic bin I received at one of my bridal showers and placed all the bathroom cleaning supplies in their - including a separate sponge because I feel like you shouldn't use the bathroom sponge for anything else.
     On the left of the cabinet I placed an organizational shelf. I put all dusters on the bottom & placed extra sponges, plastic bags, and cleaning wipes on top.
I don't like leaving my rubber gloves out and I didn't want to necessarily place them on top of something after I use them and their wet so I took a paperclip, unbent it and fed it through the hole on the back of my towel rack. I then twisted the bottom end of the paperclip around a binder clip & use that as a way to hold the gloves. Easy to access and I don't have to lay them down on anything.


-S


Wednesday, June 27, 2012

DIY: Plastic Bag Storage

     We always end up having an EXCESS of plastic bags that end up accumulating under out sink in a big blob that ends up driving me nuts. Well, sometime last year (after we moved out here to Arizona) Anthony and I came across this brilliant idea on the internot. He actually did this the first time - but since we had to re-stock the bags, I did it this time. All you'll need is excess bags and an empty kleenex box. 

The blob of plastic bags
 Take a bag and flatten it out as best you can. 


Then fold it in half long ways (like a hot dog)

 And then again


Do this to a bunch of bags and then line them up on the ground - with one about half way down the other - and continue the pattern. 

And then roll them up!

Stuff 'em in the kleenex box
 Then pull up the center bag a little bit. Now, when you use a bag, the next one will just pop up - just like the kleenex did before the box was empty!


Now it's easy to store the bags and re-use them without it turning into a plastic bag monster.

Neat and tidy plastic bags to you!
-Sara


Tuesday, June 26, 2012

Hair

My husband is a hair stylist in Scottsdale (check out his facebook page if you're close for contact info), so I thought it'd be fun to post pictures of my hair since I met him in 2009. I think the number count is 25+ hair changes...we've known each other for 3 years...
This is around the time he met me - black

Dark Brown

Dark Brown with Highlights

Dark Brown with different highlight placement

Gettin' lighter


Blonde

Blonder

Even Blonder

Gettin' blonder!


Now, let's chop it off and make it red

This is what happens when you dump fire engine red on bleached hair - it fades to a lovely Fifth Element Orange.

Red again

Red with halo of blonde

Red with Highlights

Blonde again

Blonde/A-line Bob

Platinum

Blonde & Brunette

Fun color placement

Extensions

Red

Red & Blue

Just Red

Pink


and now...Brunette!